Youth Baseball Hitting Drills
As coaches we sometimes become anxious to jump into youth baseball hitting drills because we know the difficulty of teaching and learning the art of hitting. However, sometimes we put the cart before the horse so in this segment we’re going to begin at the Beginning … the Stance.
We’re not going to discuss open or closed stances, hands low or high, nor starting mechanisms for the feet and hands. We’re going to describe and explain the Basic, Elementary Batting Stance, where all young ball players should start at.

Balanced Stance / Youth Baseball Hitting Drills
The Beginning: Where do you start?
In order to hit the ball, a player must see the ball, therefore a good batting stance must allow the hitter to see the ball with Both eyes. In order to do this;
(1.) The shoulders must be square to the plate;
(2.) The head is level; have the hitter imagine staring directly into the pitcher’s eyes;
(3.) The chin is aligned with the front shoulder, not looking over the front shoulder;
(4.) The front hip and knee are pointing, or square, to the pitcher.
Parallel Stance:
The basic foot positioning is having the feet parallel, that is in alignment with one another. This helps:
(1.) Maintain balance because the weight is directly over the hips, which is the hitter’s center of gravity;
(2.) Allows maximum vision with both eyes;
(3.) Allows the hitter to shift his weight back, then stride forward directly at the pitcher;
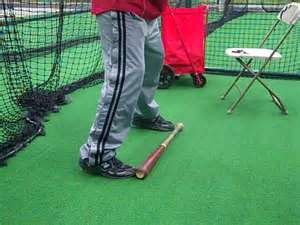
Feet Parallel / Youth Baseball Hitting Drills
(4.) Provides the best plate coverage.
(5.) Provides the best chances of the hitter keeping his head down on the ball instead of pulling it off.
Hand Positioning:
In the basic hitting stance, other than the proper firm grip with knocking knuckles, the hand positioning is largely dependent on the positioning of the elbows. Many coaches will instruct their players to keep their rear elbow up, shoulder high or higher, with the intent of producing a level swing and preventing an upper cut swing, resulting in hitting pop flies. This is actually the worse thing a hitter can do, because the rear elbow must drop, be pulled down, in order to swing the bat which causes:
(1.) As the rear elbow is pulled down, the front shoulder is lifted upwards;
(2.) The higher the elbow is held, the more forcefully the elbow is pulled down, the higher the front shoulder lifts;
(3.) This creates the upper cut swing which we’re trying to avoid;
(4.) When the front shoulder lifts, there is a tendency for the player’s head to follow, which has him pulling his head and eyes off the ball.
Clickbank Products
The proper basic elbow placement is to have your hitter form a Triangle with his two elbows and hands. The two elbows form the bottom base and angles, the hands the top. This hand and elbow placement produces a level and quick bat to ball swing.
Good Plate Coverage
Youth Baseball Hitting Drills
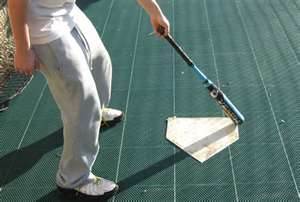
What’s wrong with a slight uppercut, which will lift the ball, which power hitters want? Simple:
(1.) The shoulders are tilted at an awkward position for hitting with power;
(2.) The barrel of the bat is underneath the hands, wrong place to be;
(3.) The bat doesn’t stay in the hitting zone long enough; it enters late because it’s approaching from under the hitting zone and exits quickly because it’s upward arch takes it out of the zone.
(4.) Dramatically increases the chance of hitting the Bottom of the ball, which produces fly balls. We all know fly balls result in outs more than ground balls.
(5.) The reduced time the bat is in the hitting zone means the chances of making contact with the ball is greatly reduced.
Youth Baseball Hitting Drills
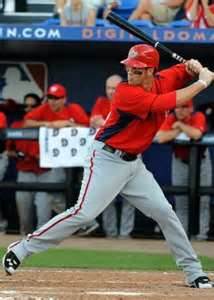
Weight transfer:
Your goal as a coach is to teach your hitters “You must go back in order to go forward.”
For young hitters I’d use the comparison of throwing the baseball to hitting the baseball. You must bring your arm back first, then bring the arm forward as you throw the ball. From a toddler a human has a natural physical ability to throw an object, maybe not very well or far, but the arm motion is there and easy to understand.
If you’ve been around ball parks any length of time you’ve heard a coach or parent tell the hitter to step into the ball. This is well intended advice, but totally wrong. The act of actually stepping into the ball results in:
(1.) The head moving too much, which distorts the vision on the oncoming pitch;
(2.) The hips have a tendency to drift reducing the power the ball is struck with;
(3.) The weight is pre-maturely shifted past the hips destroying balance;
(4.) All of these items will prevent a hitter from being able to compensate and hit a change-up or any kind of breaking pitch.
Youth Baseball Hitting Drills
Unloading

What the well meaning coach or parent means to say is “Shift your weight.” As stated earlier, a hitter must go back, which allows the hitter to store kinetic energy, before going forward, the release of the energy.
In reality the proper action is “Step in order to Hit”. From the basic hitting stance:
(1.) As the pitcher begins his windup the hitter should transfer 60-65% of his weight to the rear leg (foot);
(2.) He does this by lifting his front foot, height of lift depends on too many factors to give a concrete height, just think appropriate. This automatically shifts the weight backwards;
(3.) The hitter is now in the “load or cocked” position, which essentially means he’s ready to swing;
(4.) Placing his front foot back down, the weight begins to transfer forward and if the pitch is a strike, a hard swing is initiated.
We’ll stop our lesson here and although it may seem premature because there’s so much more to learn, but remember who you are teaching. Teaching a bit too little with complete understanding is much more beneficial than presenting so much information it produces an overload mindset which creates confusion or the mind’s complete erasing of the lesson.
Youth Baseball Hitting Drills to Hitting A Baseball
New! Comments
Have your say about what you just read! Leave me a comment in the box below.