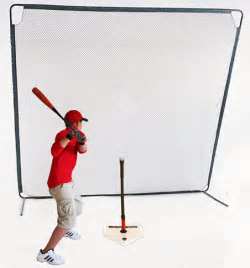
Batting Cage - Building One
A batting cage doesn’t have to be large or expensive in order to be effective and I’m going to show you how to build one which fits any sized back yard.
Commercial or full sized cages equipped with a pitching machine or a protection devise for live throwing is extremely beneficial to increasing your hitting skills, but hitting off a tee is also extremely beneficial and doesn’t require the use of such a large area.
One must remember the actual intent of a batting cage is to restrict the distance a struck ball travels in order to prevent injury or property damage and to allow for quick ball retrieval. Let’s build one that fulfills these requirements.
Material Required:
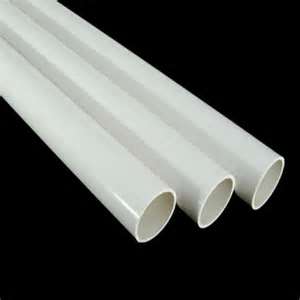
6 - 1 ½” x 10’ schedule 40 PVC pipe = $24.00
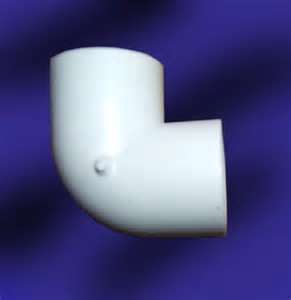
4 - 1 ½ schedule 40 90 degree angle fittings = 1.12
1 - 1 ½” “ “ Tee fitting = .46
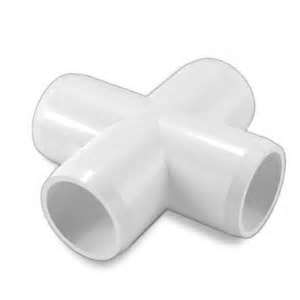
2 - 1 ½” “ “ Cross fittings = 5.22
Glue & Solvent = 8.00
Electrical Tie Straps = 9.00
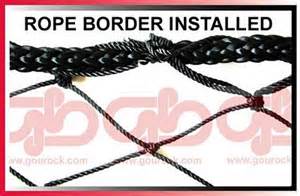
Netting 12’ x 12’ miminum = 20.00
@$ 54.00
Tools Required:
PVC saw or Regular Hand Saw
Tape Measure
Cutters
Steps To Build A Batting Cage:
Step 1: Lay 2 10’ PVC pipes on the ground. These will be the top and bottom of the cage.
Step 2: Take 2 10’ PVC pipes and cut 6’ off. This will give you 2 - 6’ pieces which will be the 2 sides of the cage…. And 2 - 4’ pieces which will be 2 of the legs.
You should have a 10’ x 6’ rectangle formed on the ground with 2 - 4’ pieces laid to the side.
Step 3: Glue 90 degree angle fittings on both ends of the 6’ side pieces.
Step 4: Cut the Top 10’ piece of pipe in two 5’ pieces. Insert the Tee fitting in the middle and connect the two 5’ pieces into it. Do Not glue this fitting.
Step 5: Cut 2’ off each end of the 10’ pipe used for the bottom of the cage.
You will now have 2 - 2’ pieces of pipe and 1 - 6’ piece of pipe. Insert the Cross fittings on both ends of the 6’ piece of pipe. Insert the 2 - 2’ pieces into the other end of the Cross fitting.
Step 6: Take 1 - 10’ piece of pipe and cut 2 - 4’ pieces out of it. These will be your other 2 legs. Take the 4 - 4’ pieces of pipe and insert into the Cross fittings.
You should have a Loose Assembled 10’ x 6’ rectangle frame with 2 pairs of legs extending outward on both sides for stability.
Step 7: Glue all the fittings and pipes together, except the Tee fitting on the top rail, one at a time making sure you are maintaining the correct form after gluing each fitting. You don’t want a fitting glued in at a 45 degree angle when it should be at a 90 degree angle or else you’ll be cutting it out and replacing it.
Step 8: This step is a personal preference step. I like to leave the Tee fitting on the top rail Unglued. I take the remaining 10’ piece of pipe and cut 2’ off leaving me a 8’ piece which I insert into the Tee fitting and move it up or down until I can firmly plant the pipe end into the ground.
This allows me the flexibility of being able to move the net around and be able to adjust the back brace forwards or backwards to accommodate and terrain change.
However, if you do not plan on moving the cage, you can glue it stationary should you desire.
Step 9:
You now have your frame built. Starting at the Top … begin tie strapping the netting to the frame. Be sure to leave the netting somewhat loose to absorb the shock of the baseball, but not too loose which could allow the ball to get through the edges or get tangled into the net.
You now have a perfect batting cage which can be used while hitting off a tee or a soft toss practice, all for @ $60.00.
The size of this batting cage is easily adaptable simply by cutting the pieces larger, making it wider or taller and for very little added expense.
Batting Cage to Baseball Training Aids

New! Comments
Have your say about what you just read! Leave me a comment in the box below.